Hi there! We’re so excited to have you here. This friendly guide is here to assist and show you how to create your first assistant (unless you already have one), tweak some necessary settings, and finally, pair it up with your favorite social media network or page.
Settings
If you haven’t gotten around to creating an assistant yet, look up to the top right corner of the page. You’ll see the comment “No chatbot created”. If you’ve already launched one, instead you’ll find the name of your last created chatbot. Just simply hit there, followed by “Create chatbot”. Then all you need is to pick out a nice name and click “Submit”.

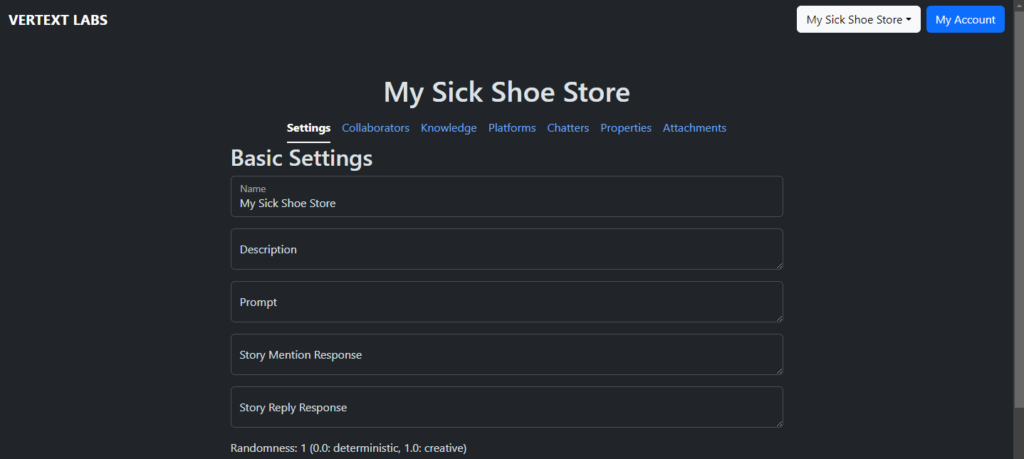
Your chatbot will automatically be selected upon creation, and you’ll now be on the “Settings” tab. This is where you get to play around with all the fundamental settings: name, description, prompt, and so forth.

Here’s a little rundown on what each field means:
- Name and Description: This doesn’t directly influence the assistant’s interaction but it’s a handy way for you to remember what functions your chatbot performs, without having to skim through other fields or tabs.
- Prompt: This greatly influences how your chatbot responds to messages. Think of this as concise, clear directions for its behavior. Whilst politeness terms like “please”, “sincerely”, “carefully”, etc. are not mandatory, clear and concise commands make it all the easier. Check out these examples:
- Brilliant prompt: “You are a virtual assistant for a gym’s website. The opening hours are from 7AM to 11:30PM. Your goal is to encourage the user to visit the gym. When they agree, request their email to send instructions and complete the registration.”
- Not-so-great prompt: “You are an intelligent virtual assistant positioned on a gym’s website. Operating hours are as follows: 7AM to 11:30PM. Your mission is to convince the user to start going to your gym. If they concede, ask for their email so they can receive instruction for completing the sign-up process.”
- In essence, if you can say more with fewer words without losing clarity or context, you’re golden!
- Story Mention Response: This is handy on platforms supporting this feature (like Instagram), it activates when your connected assistant account gets mentioned in another account’s story.
- Story Reply Response: Another feature, useful when the story posted by your assistant-linked account receives a reply.
- Randomness: If you want predictable responses, lean towards 0.0; but for more unique and innovative responses, a setting closer to 1.0 is your best bet!
- Response Maximum Tokens: This controls the maximum chunks of data each answer will contain. If your assistant runs out of tokens halfway through a sentence, the sentence
Collaborators

The more the merrier! (not necessarily) Feel free to invite others as collaborators using their registered email addresses. They’ll then have full access to your assistant.
Platforms

Once you’re happy with your chatbot, it’s just one more click before you can start having a chat. We currently are compatible with Facebook Messenger and Instagram. Pick whichever platform you prefer so we can handle all the sending and receiving for you. However, if you decide on Instagram, just remember to grant us permission to send messages on your behalf through the connected page.
Testing Time
It’s showtime! 🎉 Now your assistant is ready to chat away. You can try it out and see how it behaves. Enjoy the journey!
Leave a Reply